Stainless steel fret thoughts

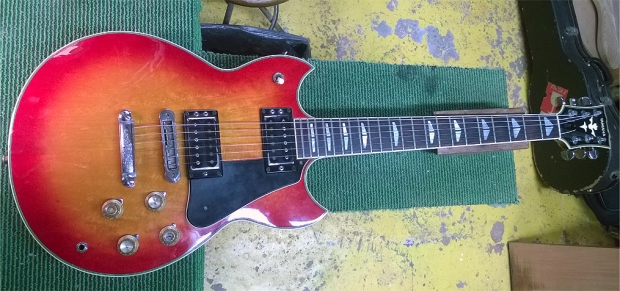
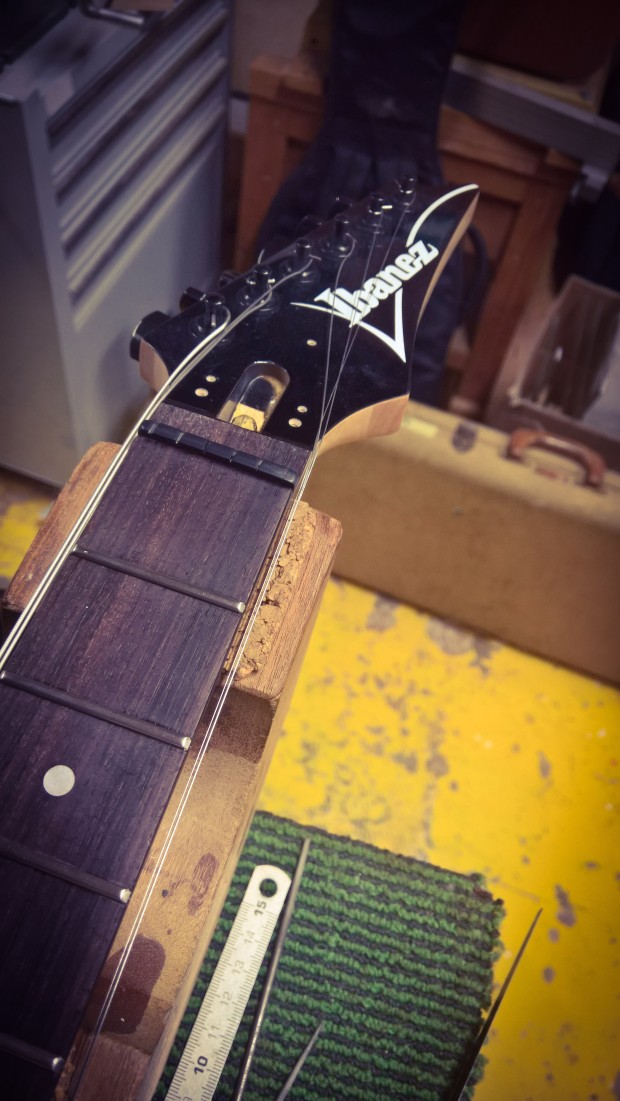
Recently I did a refret on an Ibanez RG550 electric guitar. Not a regular refret as the owner had some requests:

  • make the fretboard flat, no radius, like a classical guitar
  • replace the locknut by a Graphtech Black Tusq XL nut to match the flat fretboard
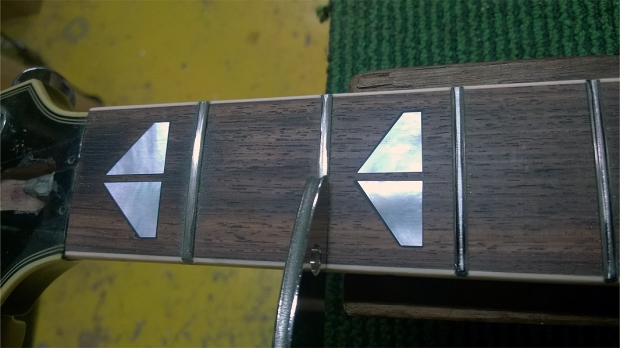
  • use stainless steel fretwire

ibanez_rg550

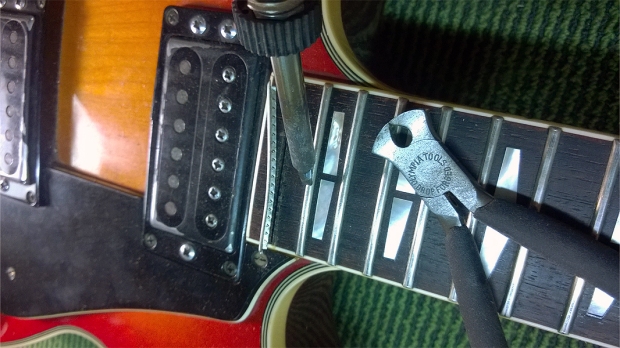
Stainless steel fretwire, wasn’t that the material that kills your tools? Hmmm… let’s just do it. I ordered a bit of Jescar FW58118 3mm wide super jumbo fretwire, the biggest fret you can get. I also ordered a Summit fret “tang” nipper just in case. I anyway wanted to replace the old StewMac nipper that started to make funny squeaking sounds – a sign it will break soon as experience learns at unwanted past moments.

summit_fret_end_nipper

The leveling of the fretboard was straight forward, the original Ibanez radius was somewhere around 16″.

I refret any guitar with the “tang” of the fret (the part that sticks in the wood) cut back a bit. Most fretboard shrink a little at dry periods during the year (special winter when you heath up the house) as a result you will feel the fret ends. It is much easier to sand back only the top parts of the fret if the “tang” is still inside the wood. At least that is my way of doing.

Cutting the “tang” with the Summit nipper is a relief compared to the StewMac gizmo. It is expensive but very easy to get used to. It has a depth stop for repeating work. Of course a few test cuts are needed to get to know the tool. It cuts the “tang” very smooth, and the fret does not need to be worked on after. The stainless steel frets are cut well, just make sure the wire is set wel in the tool before cutting. Once you know it it’s easy.

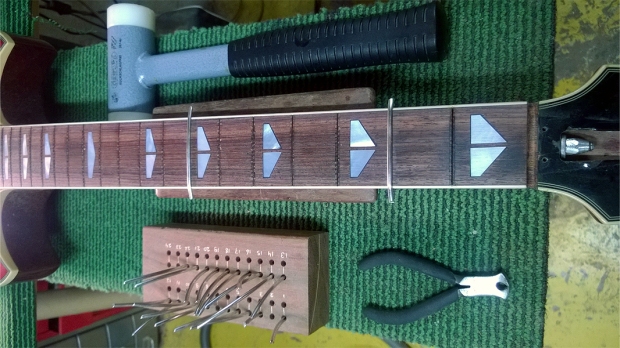
Even on a flat fretboard I am used to hammer the fret in with a little overbend. My thought was the role I got was a good overbend. It was not. Compared to regular Dunlop nickel-silver fret wire the Jescar stainless steel behave almost like spring steel. I had to make the fret wire more straight.

fret_bender_mod

I used a little modification on the StewMac fret bender. I placed a washer under the two smaller bearings, to be able to feed the fretwire mirrored in the bender. A rather straight fret was coming out, wich could be bend slightly in radius the normal way. That worked great.

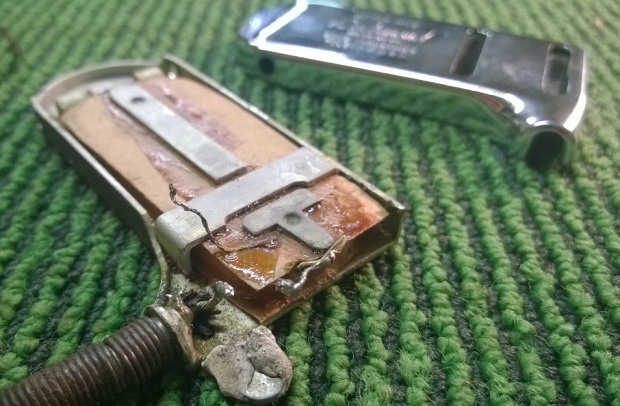
To cut the fret ends after fretting the guitar neck, I used my old fret end nipper. I think the nipper is retired and I have to place another order at Summit in Slovenia.

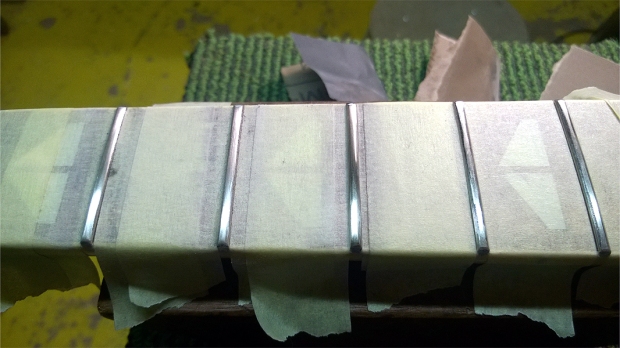
Leveling the frets obviously costed many sandpaper. To crown the frets I used another StewMac tool I really like, their offset diamond fret crowning files. Just the end of the file gets slowly stuck in my hand as I work on a fretboard, this time I made a maple cap to support my hand. The cap is just clamp fit on the tool and can be removed.

fret_file_mod

The result of the refret, although a lot of hard work, was worth it. Bends are super smooth to play and the hard frets seem to give the guitar a quicker response. The guitar was by request setup with flatwound strings, the instrument still had enough bite and attack with the warmth of the flat strings.


The Weissenborn of Ivo Meijer

ivo_meijer

Dutch guitarist Ivo Meijer fell in love with my  2009 made Weissenborn Style 1 with a spruce top and wide string spacing at the bridge. As he is very pleased with the instrument I digged up some construction pictures – for your pleasure!

Ivo_Meijer_weissenborn_1

This was my last sitka spruce top Weissenborn I made, as many people started to order my more populair style 4 Weissenborn. The Sitka spruce adds more brightness and sharpness to the sound while still keeping that typical full Weissenborn sound. The instrument has my square bridge design and bindings around the back and top. The back and sides are made from a nice curly bubinga set.

Ivo_Meijer_constructie_1

A thickness sander is used to thin the wood to the right thickness. I tap and flex the wood to keep a feeling on the strength and tone.

Ivo_Meijer_constructie_2

Here the back is clamped in a “Go-bar” system. The sticks apply presure and the wood is pressed in a dome shaped template.

Ivo_Meijer_constructie_3

A side is bended and prepared for glueing in a template. The Weissenborn needs extra large pieces of wood, sometimes it is very hard to get good quality wood in Weissenborn size.

Ivo_Meijer_constructie_4

The head is made seperate and glued in the box. The rest of the “neck” is hollow and part of the typical sounding Weissenborn.

Ivo_Meijer_constructie_5

A bit difficult to see, but the head is glued between the top and the sides.

Ivo_Meijer_constructie_9

Some overview of the construction. I build all acoustic guitars in the Spanish way – upside down in a solera (working board). On the right you can see the spruce neck reinforcement blocks.

Ivo_Meijer_constructie_6

While the head and endblock are glued, the rest of the side is put on the top without glue. I put all small mahogany blocks in by hand with glue and let it dry overnight. Then the side is glued to the body. Later, a binding will be glued around the top to make a second glue joint from the outside. In that case the binding is not only a decoration but also has a structural reason.

Ivo_Meijer_constructie_7

Here the top linings are glued to support the back. These are not seperate blocks.

Ivo_Meijer_constructie_8

The Weissenborn before applying natural PU laquer. Many layers are put on and many layers are sand of, to result in a thin polished film to not disturb the fibration in the top.

Ivo_Meijer_weissenborn_3

Ivo_Meijer_weissenborn_2

Classical guitar making, #1

The start is always difficult.

A very long time I wanted to start making classical guitars, but never I had the time or energy to start. Running a workshop alone, mixing repair work with new build guitars and making allready a lot of different type of guitars kept me from starting.

I realised I had at least four sets of wood for making a nylon string guitar so I better started or never start at all. I choose a building style, made templates and decided to keep things very simple. Remebering my first steelstring I build 17 years ago was a complete disaster, I started thinning the wood.

fcg001_3

This guitar is the first result. I call this #1  “The Wolf”, because it is full of it. And it was hard to catch.

A first guitar hardly ever becomes perfect, and my feeling on taming a nylong string guitar top is around zero.

So what is the result? The instrument is playable, action and neck angle are correct, bridge saddle height is within limits and the instrument is not to heavy. The tone and volume are a bit hidden inside the guitar, and the instrument sounds too warm and lacks brightness. The three treble strings are coming out too soft, although the G string is kind of on level with the B and E string. And wolf tones, a lot. Striking the b string almost gives you two notes.

The top lacks a good dome – somehow the dome I shaped in the working board did not hold in the top, so that will be a major attention for the next instrument.

I decided to not apply a finish on the guitar yet – maybe later, or never. The guitar has no decoration, the binding around the top is to strengthen the side-top joint in my choosen construction technique.

fcg001_1

No roset inlay – at least on the outside. The spruce top was laying around in the workshop for a while and I once started an inlay. I was not happy with the result and put it back on the shelf. Now I decided to use it for this guitar, just flip it over and continue. The bracing style is Romanillos – maybe I should do a Torres instead. This is very light.

I however did enjoy the Romanillos side-neck joint, and will keep that in the construction of the next one. It makes it more relaxed to join the sides on the top. The sides are glued in the neck and set with two wooden tapered wigs.

fcg001_2

Most important question: was it fun to do? Well you see, I can’t wait for the next one….

CTS custom potmeters

Custom CTS potmeters are now available.
cts_500

Custom CTS vs standard CTS

Regular standard CTS potmeters are very common used in electric (bass) guitars, and they work just fine, but some people who has used them might have noticed a variation in resistance value and taper curve.

A standard CTS potmeter have a big variation of +/- 20% in the real resistor value as you measure a few potmeters of the same listed value. The new custom CTS potmeters have only a +/- 9% variation. The real value is more close to the listed value.
The custom CTS potmeters also never get a lower resistance than 250k or 500k, and have a custom taper curve that is suitable for both volume and tone control.
Here is a summary:

name use curve value tolerance measured value
CTS 250k audio potmeter volume logarithmic 250k +/- 20% 200k – 300k
CTS 250k linair potmeter tone linair 250k +/- 20% 200k – 300k
CTS 500k audio potmeter volume logarithmic 500k +/- 20% 400k – 600k
CTS 500k linair potmeter tone linair 500k +/- 20% 400k – 600k
CTS 250k custom potmeter volume & tone custom 275k +/- 9% 250 – 300k
CTS 500k custom potmeter volume & tone custom 550k +/- 9% 500 – 600k

What value should you choose?

A potmeter, when turned at volume 100% will cut off a little bit of treble from the sound. If you connect the pickup straight  (without a potmeter) to the output, it will sound a little more bright. The lower the value of the potmeter, the more the treble cutoff will be. A 250k potmeter will cut off more treble than a 500k potmeter.

In general, a 500k potmeter is used with a humbucker and P90 pickup, and a 250k potmeter with a Fender style single coil pickup and most bass guitars.

There is no hard rule, a Jazzmaster has 1M (1000k) potmeters in the lower sound controls. Many strats with a humbucker bridge pickup have still a 250k potmeter.

When your pickup sounds a touch too bright, you could try to change the potmeter to a 250k value.
When the pickup sounds muddy and dull you could try to replace the potmeter by 500k value.

If you have questions feel free to contact me a info@fernsguitars.nl

CTS potmeters can be ordered here:

http://www.fernsguitars.nl/nl/webwinkel/webwinkel.php?cat=42 (Dutch)

http://www.fernsguitars.nl/en/webshop/webshop.php?cat=42 (international)

Fern’s Custom Orville Breeveld signature electric guitar on the website!

After Orville Breeveld got some time to get used to his new electric guitar, there was recently a moment to do a re-setup on the instrument and to make some pictures for the website.

The setup was no unnecessary thing – the first thing Orville did was to ship the fresh instrument to Indonesia and do recordings and gigs there.

The guitar is now featured on the website here:

http://www.fernsguitars.nl/en/guitars/custom-orville-breeveld.php (international)

and here:

http://www.fernsguitars.nl/nl/gitaren/custom-orville-breeveld.php (Dutch)

custom-orville-breeveld-gitaar-detail-5

50’s De-Armond pickups.

DeArmond pickups from the 50’s are considered the sweetest sounding transducers ever made for jazz guitars among many musicians. The pickup came in many variations and sometimes I get them in the workshop for repairs. Most common is the famous “Guitar Mike”.

This Gibson L5 is fit with a model 1000 “Rhythm Chief”. My job was to re-install the pickup permanent on the instrument without the sliding attachment and the volume and tone control. To do so, we decided to drill a bigger hole in the tailpiece to fix a Switchctaft output jack / strapholder combination. The pickup would be fixed on the body with double sided tape. A piece of very sensitive masking tape would protect the guitar finish.

dearmond3

I tested the pickup, fixed the new output jack, removed the controls from the pickup, connected the pickup and…no sound! I called the customer to tell the bad news and we decided to open the pickup – at the customers risk. DeArmond pickups have been made with extremely thin wires and because they are almost 70 years old, the insulation around the wires can be dry and easy to damage. Some pickups just die when you look at them.

dearmond1

After opening the pickup I connected a temporal connector, and the pickup just worked. After closing the pickup – no signal. After a close look and some physical tests ( pressing here and there, moving the cable) it seemed to be a thin wire got disconnected after pressing the side of the pickup. Because the pickup has been waxed (probably not original) we decided to leave the pickup and make the cover a bit wider so it would not clamp the side too much. I made a small piece of brass to slide in the side to keep the cover on the pickup. This worked. After attaching the pickup secure to the Gibson L5 the customer has a semi-permanent fixed system in wich he doesn’t need to be afraid of broken cables, another common problem with older DeArmond pickups.

dearmond2

This operation shows how careful you have to be with the pickup and how sensitive the material is. To rewind the coil is another problem; most pickup builders refuse them as it takes sometimes over 10 tries to make a new one.

dearmond4
Here is a 50’s DeArmond Guitar Mike, I had to replace the cable. When replacing the cable (original 50’s too) the insulation within the cable just came out like powder, making the cable worthless. To replace the cable, you have to careful open the pickup. This one has not been waxed, and makes it possible to re-solder the wires directly to the coil. This is still a tricky job, if you damage them or if you are shakey with the soldering iron it can end up in the trash bin.

dearmond5


Vigier output modification

For all of you people who own a Vigier guitar and get nuts from the output getting loose all the time. For this particulair guitar it is very hard to tighten the jack again. Here is a simple modification.

vigier-1
1. This output is used standard in the guitar. It is a Switchcraft tube jack that can be only tighten from the inside of the guitar. And there, in the electronic cavety there is no space to use standard wrenches or plyers.
If you are not careful you ruin the thread and have to drill out the complete jack.

2. I replace them by a Switchcraft tube jack that is used for acoustic guitars, the ones that are output and strap holder.

3. I remove the strap holder washer and just fit the tube in the guitar. It now can be tighten from the outside with a regular 13mm pipe wrench, although you want to hold it from the inside to not twist and loose your electronic connections.

vigier-2
It might not look THAT pretty; it is very practical, and to connect the cable is really no problem.

Refret of an old Yamaha SG700

One recent job I did was the refret of an old Yamaha SG700. The SG700 was produced only between 1976 – 1979. The guitar has a one piece mahogany neck, rosewood fretboard, mahogany body and a maple top. The pickups have coil taps for more sound variations.

I would like to share some images about the work.

refret_yamaha_sg700_1
1. This is the guitar. The instrument was owned by the father of the customer and was collecting dust for quite some time.

refret_yamaha_sg700_2
2. Frets are worn and unplayable. The frets are really low, flat and some deep gaps are visible. A low fret is not easy to play by everybody, though some people like them. A flat fret is very difficult to play. The intonation point is shifted foreward, and the string can make lots of fretbuzz as the string touches a big surface on the fret. Good for a sitar like sound, not for an electric guitar.

refret_yamaha_sg700_3
3. The Yamaha Original tune-o-matic bridge has a problem that happens to any old tune-o-matic bridge, they bend under the heavy string pressure after a long time. The neck has a 14″ radius, the bridge should have the same, but is bending too far. The A, D and G string don’t even come near the radius cauge.

refret_yamaha_sg700_4
4.The truss rod nut was a bit far on the truss rod, and it was not easy to take it out. I placed an extra washer and greased the nut. Now it can be adjusted with a standard wrench in the future. The truss rod is the heart of the electric guitar, if it does not adjust good, you can never have a good setup.

refret_yamaha_sg700_5
5. Removing the old frets. I pre-heat them with a soldering iron and a modified tip. If frets have been glued in place with CA / super glue, the heat will break down the bond.

refret_yamaha_sg700_6
6. The empty fretboard is cleaned up and sanded a bit. If small wearing spots or gaps are visible in the fretboard I sand them out completely, deeper spots I fill or just leave, depending on the customers need. Also a good moment to correct the shape of the fretboard if needed.

refret_yamaha_sg700_7
7. New frets, I needed a special size fret, as a more standard size fret did not hold good in the wood. Frets are prepared for all positions and are hammered in with a so called ‘death blow’ hammer. It is a hammer filled up with some powder in the nylon heads, so it does not bounch back. All force goes direct into the fretwire. There are many ways of installing frets, but I always feel most comfortable with the hammer-in methode.

refret_yamaha_sg700_8
8. After installing the frets, they need to be lightly levelled again. I Always mark the top of the frets to see what I am doing.

refret_yamaha_sg700_9
9. The frets are now a bit flat, so they need to be round again, a job called crowning. Special diamond cut files are used. They have two sides: one for small – medium wide fretwire, and one for jumbo fretwire.

refret_yamaha_sg700_10
10. I finish the frets in a rather straight foreward way, with several grids of sandpaper and polishing compound. I make sure the edges are round up too.

refret_yamaha_sg700_11
11. The topnut is replaced by a bone nut. The old nut was a bit worn and anyway too deep to fit the new fretwire. The nut needs to be cut very precise to fit the frets. Many times at a refret a topnut needs to be replaced too.

refret_yamaha_sg700_12
12. Remeber the bridge? I usually replace the bridge if possible. However this bridge has a very different size and appearance. So I did a correction directly in the bridge saddles.

refret_yamaha_sg700_13
13. Happy and ready to play!

Stephanie Lollar visits Amsterdam.

This morning I met Stephanie Lollar shortly in the workshop. She visit Amsterdam just a few days. We had a relax talk about kids, travelling and of course her husband Jason Lollar and the Lollar pickup company.

The company just moved last summer to a new building. The new building has more work space  and more daylight. Although it was a big step to move, it seems to work out very wel.

Later Stephanie went to visit some musea and I went to spend the rest of the day with my son, the reason the shop is usualy closed at Mondays.WP_20150105_002


Fern’s Guitars takes a small break

Fern’s Guitars takes a small break to back up with the familly and to be charged for a productive 2015!

The workshop is closed between 25th of December and 6th of January. 7th of January the workshop is open again.

Email and phone are answered after 3rd of January.

The webshop is open and orders can be placed, however delivery starts from 6th of January.

All have a great and musical 2015!

Ferdinand